![AERO 40 Ⅱ ディスクブレーキホイール[リム内幅23mm] - ICANホイールジャパン](http://icanjp.com/cdn/shop/files/1_d90bc651-48bd-4f22-9e13-6d963c283ba6_1370x.jpg?v=1753869976)
![AERO 40 Ⅱ ディスクブレーキホイール[リム内幅23mm] - ICANホイールジャパン](http://icanjp.com/cdn/shop/files/2_37e9600e-9785-4d45-abe1-df49da71e7ee_1370x.jpg?v=1753869976)
![AERO 50 Ⅱ ディスクブレーキホイール[リム内幅23mm] - ICANホイールジャパン](http://icanjp.com/cdn/shop/files/ICANAERO50IIDiscWheels_1_1370x.jpg?v=1758088613)
![AERO 50 Ⅱ ディスクブレーキホイール[リム内幅23mm] - ICANホイールジャパン](http://icanjp.com/cdn/shop/files/ICAN_AERO_50_II_Disc_Wheels_2_1370x.jpg?v=1758088881)


![FL40Ⅱ ワイドリムロードカーボンホイール 軽量「内幅23mm] - ICANホイールジャパン](http://icanjp.com/cdn/shop/files/1_771b4686-2e73-4d35-b47c-b123b298f7f7_1370x.jpg?v=1755486826)
![FL40Ⅱ ワイドリムロードカーボンホイール 軽量「内幅23mm] - ICANホイールジャパン](http://icanjp.com/cdn/shop/files/2_76389d17-9f29-42af-aa59-a695414fcaf7_1370x.jpg?v=1755486826)
How do I choose the right frame size?
Road riding is very demanding as riders need to maintain the same position for several hours. This makes fit crucial for road riders.
This article explains the basic knowledge of frame geometry and four steps to find the right frame.
A bicycle frame consists of a front and rear triangle, a simple structure with just eight parts forming the frame. Each bicycle has three points of contact with the body: the handlebars, saddle, and pedals.
The spatial position of these three parts determines the rider's fit, which is determined by the rider's body proportions, strength, and flexibility.
Therefore, you can start by measuring the ideal contact point positions for the rider, and then continue with trial and error or use a professional bike fitter.
This has developed rapidly over the past few decades.
Rider position on the bicycle

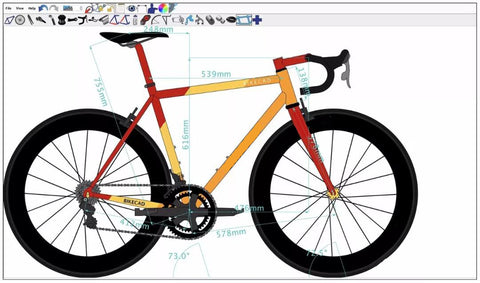
Test the position of the handlebars and seat relative to the bottom bracket to determine each contact point. Generally, a schematic diagram is drawn with the handlebars and seat as the center points, as this eliminates the effects of differences in handlebar size and seat shape. For pedals, their contact point position is determined by the crank length.
Step 1: Frame Height
Frame height is important for any rider. There are acceptable maximum and minimum values for handlebar height, seat height, etc. This is the first thing to measure when determining frame size.
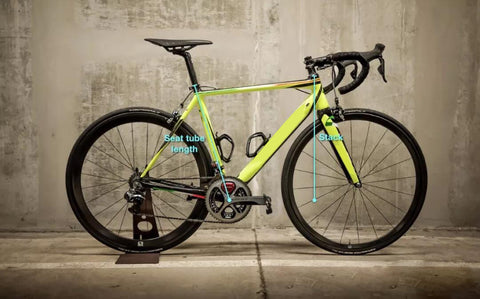
In the past, road frames were horizontal frames, and the seat tube length determined the primary frame height. After the introduction of compression frames (1990), the head tube height became a reasonable substitute, but the stack value introduced later became more reliable.
Stack height represents the vertical distance from the top of the head tube to the center of the bottom bracket. This is a modern equivalent to seat tube length, allowing riders to quickly determine if a frame is suitable.
Importantly, stack height does not include the part above the headset, so the stack height will be 30mm higher than the frame. The frame's stack height includes a special front fork. This varies by brand as road bikes do not have a standard length front fork.
Step 2: Frame Length
Before compressing the frame, the top tube length (measured from the center of the head tube to the center of the stem) represents the frame length, and provides the horizontal distance from the stem to the seat tube, making it easy to calculate the ideal stem length.

Frames with sloping top tubes have a horizontal top tube length that is longer than the actual top tube length, and most bicycle manufacturers have an equivalent top tube length, so it can be determined as easily as with traditional frames.
Since the horizontal top tube length is affected by the stem angle and needs to provide a more reliable frame length measurement, the horizontal distance measurement from the center of the bottom bracket to the top of the head tube is called "reach."
There are various stems on the market, most of which are limited to 10mm in length, so riders need to pay attention to frame length if they want to achieve a millimeter-level fit. Also note that stem length affects frame control. Generally, a long stem (> 100mm) slows down the steering response of the handlebars, while a short stem (< 100mm) speeds up the steering response, but this is also influenced by the frame head tube angle and trail value.
Step 3: Saddle Setback
While the fore-aft position of the saddle is not as critical for adjusting the distance from the handlebars, it has a significant impact on the thigh muscles, requiring precise positioning to maximize rider efficiency. Most seat tubes allow for precise adjustment of the saddle's fore-aft distance (<1mm).
The limitation of the adjustment range is the length of the seatpost. It is also possible to replace the seat tube with a different offset. This is less effective, especially as more bicycles use special seatpost designs. Finally, the seat tube angle determines the total amount of saddle setback, making it an important data point to consider when measuring a new frame.
If the rider requires more setback, choose a smaller riser angle (73° or less). Conversely, if the rider does not require setback, choose a larger riser angle (74° or more).
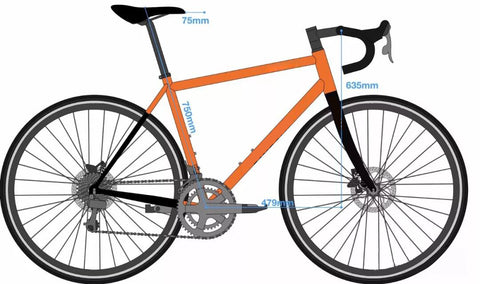
Step 4: Other Measurements
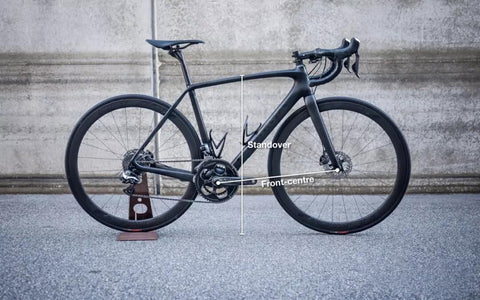
The front center measurement represents the distance from the bottom bracket to the center of the front wheel. This is crucial data for determining whether your toes will touch the wheel. This data depends on the frame's front extension, head tube angle, and fork rake. It needs to accommodate the front wheel radius (330mm~), crank length, and foot length relative to the pedal axis (at least 60mm).
This value is 560mm or more. With a large frame, there is no problem. Small frames are more susceptible, especially when using large tires or if the rider has long feet. Therefore, you need to consider the front center when purchasing a bicycle.
The standover height represents the distance between the top tube and the ground. If the top tube is sloping, an average value is typically used. This value determines whether your feet will touch the ground.
Frame Size Examples

Rider's ideal handlebar and seat position
If a rider is looking for a new frame, they have two options: the Giant Defy and the TCR Advanced Disc. This rider is already fit and knows their optimal data.
The M/L size of the Defy offers a very good fit. The stack height is optimal for the handlebar position. The 110mm stem used on the commercially available complete bike does not need to be changed. At the same time, the saddle on this frame also achieves ideal setback.
The TCR Advanced Disc uses the same M/L size. Although the frame has a reduced stack height (562mm vs. 586mm) and a longer head tube (570mm vs. 560mm), it can still be used effectively. As a result, it will be necessary to replace with a shorter stem (100mm) and use some headset washers (27mm) to achieve the ideal handlebar height.
Of course, both bikes can satisfy the rider, and despite the difference in stem length and head tube angle (73° vs. 72.5°), the TCR Advanced Disc turns faster than the Defy. However, when purchasing a TCR, you will need to replace the stem yourself.
Difference between proper and improper frame size
Bicycles have introduced compression frames that can fit a wide range of riders, thanks to the additional adjustability offered by shorter risers. By using seatposts of different lengths and offsets, and stems of different lengths and angles, frames can be adjusted slightly larger or smaller.
However, there are limits to the adjustment range. For example, if the stem is too short and the washers exceed 50mm, it will affect the balance, posture, and handling of the bicycle. If the saddle is too far behind the bottom bracket, the rider's weight will have a greater leverage effect, and as the stem extends accordingly, the leverage effect of the front fork steering will also increase.
Even if you don't go to a store for a fit, you should know the most basic data (measure body parameters using fitting software) and use the four steps above to select the appropriate frame size.
Recommended Related Articles
[Amazing] Explaining the effects and benefits of hill climb wheels
For those interested in track bikes
Road bike brakes ① Rim brake edition
Road bike brakes ② Disc brake edition
ICAN AERO40 Carbon Wheels Jonny Pink's enthusiastic review!
Chinese Carbon Wheel Buying Guide
Basic knowledge of bicycle wheels
Are cheap disc brake wheels good? [Why you should avoid cheap ones]
[Aluminum is the only choice for city riding] What types of bicycle frames are there?